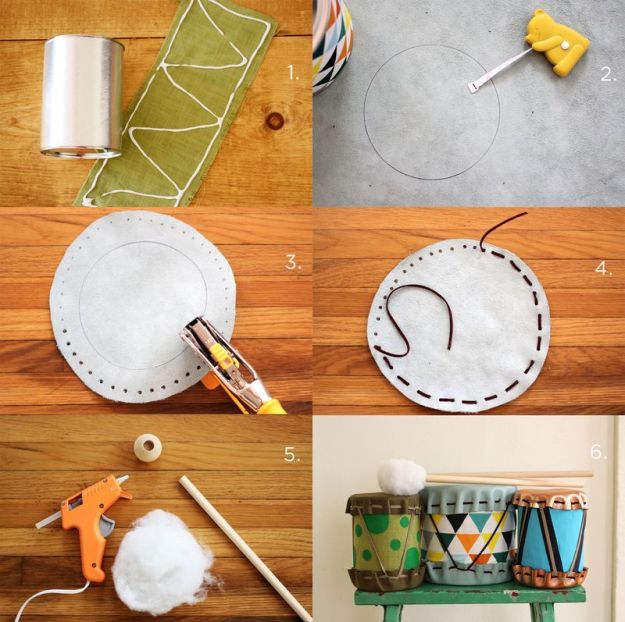
Hola readers,
My boyfriend gave me a sewing machine for Christmas and I am dying to learn how to use it. I am taking a class this weekend and I cannot wait. There are so many things I want to make and I hope I can pick it up quickly. I am not a designer in the least but would love to make things to fit me and my tastes. I will be sure to update you on my first sewing experience . Wish me luck 🙂
Long tight-knit maxi dress tutorial
Supplies:
2 yards of stretchy knit fabric
Instructions:
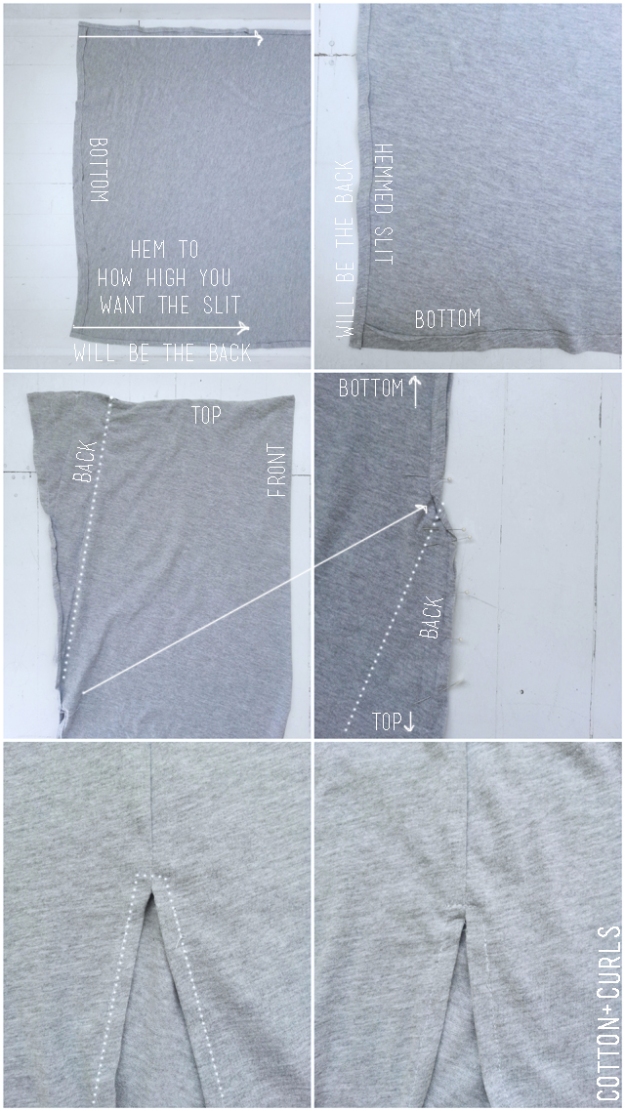
1. Cut a big rectangle as wide as your hip’s length and as long as your natural waist to the floor plus 2 inches. I always leave a little extra in case of mistakes.
2. Fold in once, iron, then hem the bottom and inch.
3. Fold in twice, iron, hem a 1/2 to 3/4 inch up to the length you want your slit. Mine was 18 inch (just to me knee).
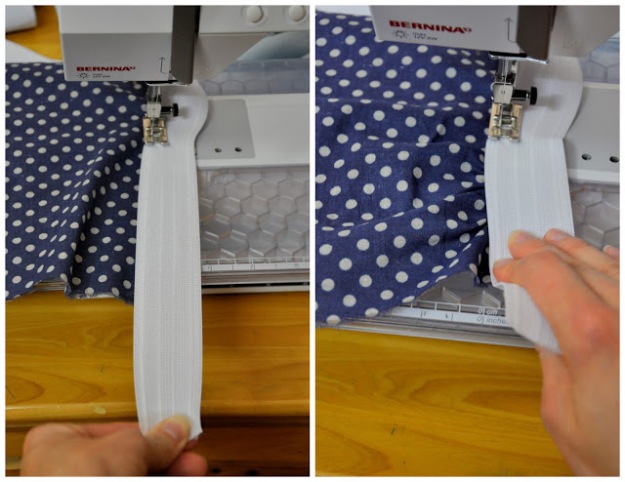
4. Sew the seam up ending the stitch at the beginning of the slit’s hem.
5. Secure the slit from getting any bigger by sewing a topstitch at the top.

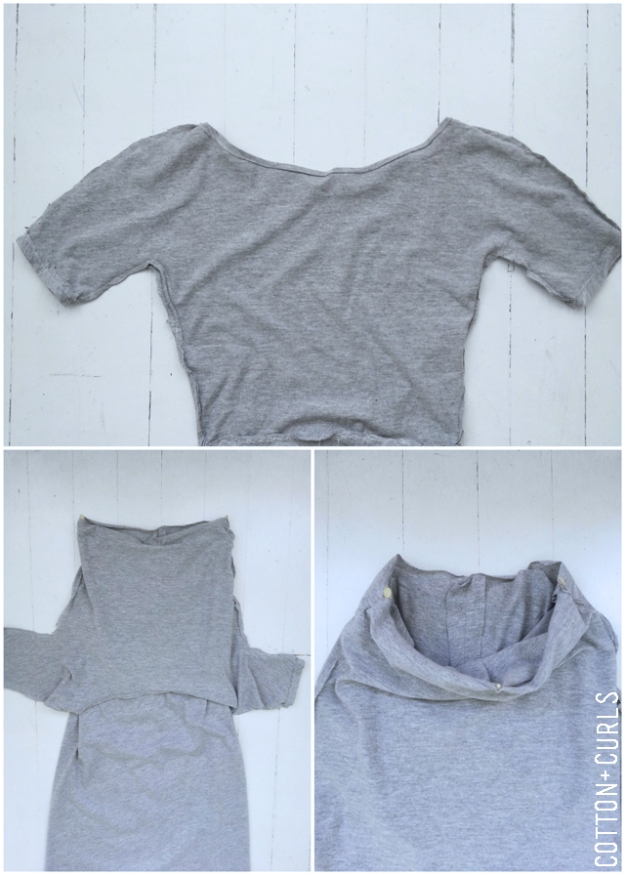
6. Cut out the top by using a tight-knit shirt as your guide, the top needs to be shorter, ending an inch below your natural waist.
7. Sew up the sides and the shoulders.
8. Hem the sleeve 3/4 inch and the neckline 1/2 inch.
9. Join the top with the bottom by slipping the skirt into the neckline of the top, and pinning the waist opening right sides together.
10. Sew together.
Polka Dot Pin tuck Skirt Tutorial

Supplies
around 2 yards of fabric (if you want it less big than mine, then so less fabric) *make sure it is a more flowy or light weight/thin fabric because if it is heavy or stiff it will be very hard to gather or it will be way too fluffy looking.
*optional – lining fabric or buy extra to add underneath. I just wore a slip
sewing machine
thread that matches
scissors
elastic (or zipper if you want to add a waist band with the fabric instead)
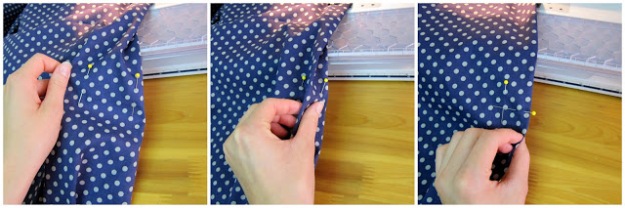
1. Measure how far you down from your waist (where you want the skirt to sit) to where you want the first pin tuck to start and make sure you add an inch for the elastic (All together mine was 8 inches form the waist to the first pintuck).
2. Mark this with a fabric pen, or if you are like me and you don’t have one, then mark it with pins.
3. Then start marking your pintuck. Choose how big you want your pintuck ( I choose an inch), the double it (for me 2 inches), then mark that with pins or a fabric marker. So….in my case 8 inches down plus 2 more inches.
4a. Iron or just sew depending on what you are more in the mood for. If you iron, match up the pins or the fabric pen markings (This is why I feel pins are WAY more helpful) then Iron down a crease. Keep the pins in to make it your guide to sewing the pintuck, unless you marked it then that will be your guide. OR 4b.
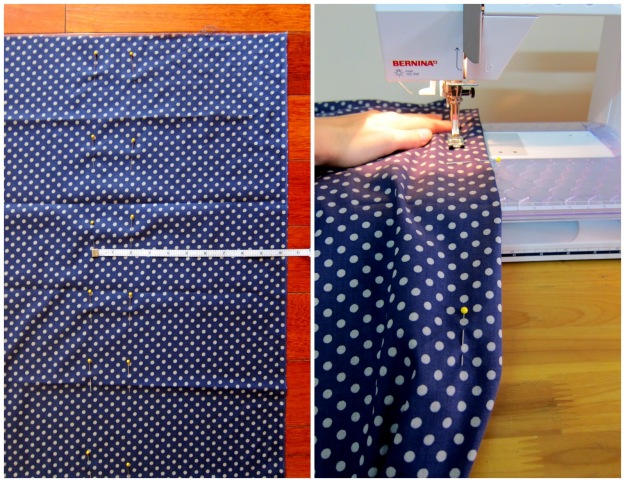
4b. Because I have a lack of a big ironing board I decided just to sew and bypass the whole iron thing till the end. So, This is where I matched up the pins between my fingers then added another pin to keep it perfect. If you also marked, then you can take out the 2 pins and just keep the one pin.
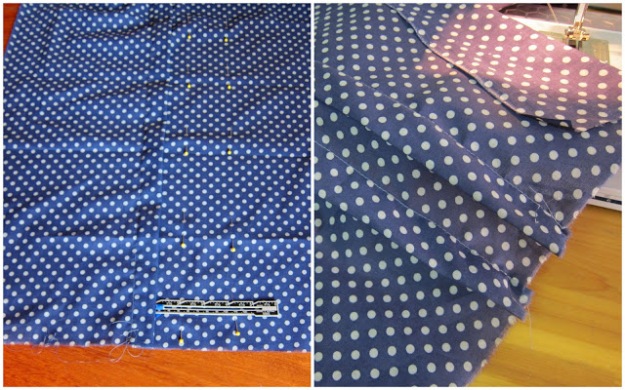
5. Time for pintuck #2…and the rest! So, space the pintucks out however much you want. I decided to make the pintucks and inch long and the space between an inch long as well. So, I measured an inch from the first pintuck and marked it, then measured 2 more inches below that (because my pinctucks are an inch long, then you have to double it). Then sew by using either 4a or 4b. Then continue with as many pintucks as you want. I did 7 all together.
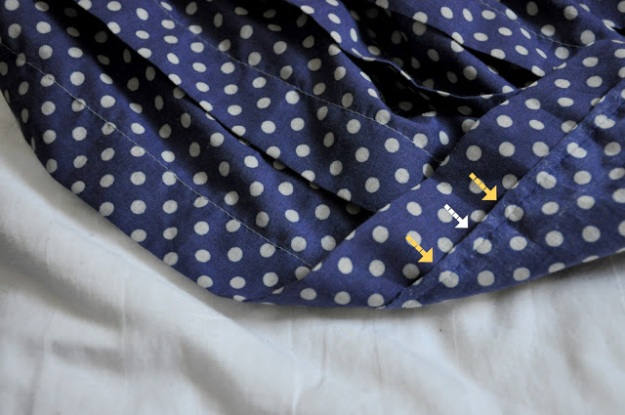
6. Now time to hem! Under your last pintuck, cut down the fabric short enough so it can’t be seen. Mine was about a quarter-inch. Here you can serge or finish it off by zig zag stitching the edges like a serge. Make sure the thread matches. I didn’t have matching thread so I ripped the fabric short so it would curl inwards. But that won’t prevent the fraying.
7a. How to add the elastic is super easy. The first way you can do it, shown below, involves stretching the elastic as you sew. The more you stretch the more gathered it will be. I put it on a very long straight stitch because it will give more room to stretch and the stitch will be tiny when unstretched. If you want the fabric to be stretched equally around the elastic band, then mark the elastic band in quarters as well as the skirt’s un-gathered waist.
7b. This isn’t shown, but it is the method I used. If you are using lots of fabric or you want it very gathered and need it to fit in an elastic band, but the stretching isn’t getting all the fabric gathered then you will have to gather the fabric before hand with a basting stitch or ruffling or gathering foot. When the waistband of the skirt is all gathered to exactly your waist size, add the elastic without any stretching at all, but make sure to zig zag stitch this time. when you have finished, pull the waistband to hear lots of stitches popping, which is the basting stitch. Then at this point the zig zag stitch will be holding it up.
8. Sew the two ends together putting right sides together. pin the pintucks and elastic band together before hand to make sure they line up perfectly.
9. Iron the gathered part of the waist band to de-fruff it and iron down the pintucks!! DONE!
If you feel the skirt is very big, then wash is to soften it.
knit midi circle skirt with elastic waist tutorial
I am loving this skirt for the summer. I can already see it in florals and pastels. 🙂


Supplies:
flowy fabric – knit or polyester
elastic
sewing machine or needle and thread
thread
scissors
flexible measuring tape
pins
marking pen or chalk
Instructions:
1. I buy usually around 3 to 3 and a half yards of 44″ wide fabric, but around 2 yards for the really wide fabric. For this skirt I only had to use a few yards because it was very wide. If you get the less wide fabric, then you will have to fold the fabric over so short ends meet, and you will have to sew up the sides because they won’t be folds in that case. But for this particular fabric knit that I used, I was able to get the fold out of them to make even easy and quicker to make!
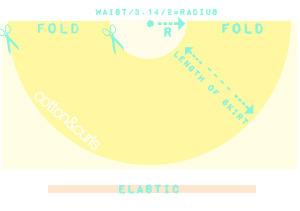
2. After you have folded and laid it out, take a long ruler/tape measure and mark the center (where the dot is)
3. Then after calculating the radius
(your waist size divided by pie or 3.14 divided by 2),
start from the center (dot) mark and cut the radius completely around to make a half circle
***If you want the wait to be gathered looking vs. smooth, then you want to add a few inches to the half circle. That is what I did with this one.
4. Then figure out what length you want the skirt and add it to the radius (for example if your radius is 6″ then add 6 ” to the length of your desired skirt length like 25″ = so you get 31″)
5. Take this length and from the center mark and cut out the half circle
6. cut some elastic
7. Divide and mark the elastic and the newly cut out waist of the skirt into quarters and pin the matching quarters of the elastic and waist together. satin stitch (close zig zag stitch) the elastic together.
8. Zig zag stitch them together, stretching the elastic as you sew — if you want the elastic to show sew the elastic on top of the fabric OR if you don’t want it to then after you sew the elastic on fold it over until the elastic is hidden. Then sew another zig zag stitch over it.
9. Hem (unless it is out of knit, then you don’t have to if you don’t want to.
Photos and Tutorials Courtesy of Cotton & Curls. Check them out for some other great ideas.
Love Mel, xoxoxoxo